homematic IP DRI32 32 Channels Wired Input Module

Mga nilalaman ng package
- 1x Wired Input Module – 32 channels
- 1x cable ng koneksyon ng bus
- 1x Bus blind plug
- 1x User manual
Impormasyon tungkol sa manwal na ito
Basahing mabuti ang manwal na ito bago simulan ang operasyon gamit ang iyong Homematic IP Wired device. Panatilihin ang manwal para sa konsultasyon sa ibang pagkakataon. Kung ibibigay mo ang device sa ibang tao para gamitin, mangyaring hilingin sa kanila na basahin ang manwal na ito.
Mga simbolo na ginamit
 Ito ay nagpapahiwatig ng isang panganib.
 Ang seksyong ito ay naglalaman ng mahalagang karagdagang impormasyon.
Impormasyon sa peligro
- Hindi kami tumatanggap ng pananagutan para sa pinsalang dulot ng paggamit para sa iba kaysa sa nilalayon na layunin, maling paghawak o hindi pagsunod sa mga babala sa panganib. Sa ganitong mga kaso, walang bisa ang lahat ng claim sa warranty. Hindi kami tumatanggap ng pananagutan para sa kahihinatnan ng pinsala.
- Huwag gamitin ang aparato kung ito ay may nakikitang pinsala o malfunction. Kung mayroon kang anumang mga pagdududa, ipasuri ang device sa isang kwalipikadong eksperto.
- Para sa mga kadahilanang pangkaligtasan at paglilisensya (CE), hindi pinahihintulutan ang mga hindi awtorisadong conversion sa at/o pagbabago ng device.
- Ang aparato ay hindi isang laruan – huwag payagan ang mga bata na laruin ito.
- Maaaring mapanganib para sa mga bata ang plastic film, plastic bag, polystyrene parts, atbp. Panatilihin ang packaging material sa hindi maaabot ng mga bata at itapon ito kaagad.
- Linisin ang device gamit ang malambot at malinis na tela na walang lint. Huwag gumamit ng anumang mga detergent na naglalaman ng mga solvent para sa mga layunin ng paglilinis.
- Huwag ilantad ang device sa moisture, vibrations, pare-parehong solar o iba pang heat radiation, sobrang lamig o mekanikal na pagkarga. Ang aparato ay dapat lamang gamitin sa loob ng bahay.
- Use the device in alarm technology applications in accordance with DIN EN 50130-4 only in conjunction with an appropriate uninterruptible power supply (UPS) to bridge a possible mains power failure.
- Ang hindi pagsunod sa mga tagubilin sa pag-install ay maaaring magresulta sa sunog o panganib ng electric shock. Ang aparato ay bahagi ng pag-install ng gusali. Sundin ang mga kaugnay na pambansang pamantayan at direktiba sa panahon ng pagpaplano at pag-install.
- Ang aparato ay inilaan para sa pagpapatakbo sa Homematic IP Wired Bus lamang. Ang Homematic IP Wired Bus ay isang SELV power circuit. Ang mains voltage for the building installation and the Homematic IP Wired Bus must be routed separately. Com-mon cable routing for power supply and the Homematic IP Wired Bus in installation and junction boxes is not permitted. The required isola-tion for a power supply of the build-ing installation to the Homematic IP Wired Bus must be observed at all times.
- Para sa ligtas na operasyon, dapat na mai-install ang device sa isang circuit distribution board na sumusunod sa mga pamantayang VDE 0603, DIN 43871 (low voltage sub-distribution board (NSUV)), DIN 18015-x. The device must be installed on a mounting rail (top-hat rail, DIN rail) in accordance with DIN EN 60715. Installation and wiring must be carried out in accordance with VDE 0100 (VDE 0100-410, VDE 0100-510). The pro-visions of the technical connection regulations (TAB) of the energy sup-plier must be observed.
- Obserbahan ang mga pinapahintulutang uri ng cable at conductor cross section kapag kumokonekta sa mga terminal ng device.
- Ang aparato ay angkop para sa paggamit lamang sa mga kapaligiran ng tirahan.
Pangkalahatang impormasyon ng system
- This device is part of the Homematic IP Smart Home System and communicates via the Homematic IP. Operation requires connection to a Homematic IP Wired Access Point. Further information on the system requirements and installation planning is to be found in the Homematic IP Wired system manual.
- Ang lahat ng mga teknikal na dokumento at mga update ay makikita sa www.homematic-ip.com.
Tapos na ang function at deviceview
- The Homematic IP Wired Input Module – 32 channels can be easily installed on a DIN rail in a power distribution panel. The 32 inputs can be used to connect several switches and push-buttons. Lamps or other lighting systems can then be switched or dimmed via paired Homematic IP Wired switching or dimming actuators.
- You can also configure individual inputs of the module as sensor inputs in order to monitor e.g. NC or NO contacts.
- The device offers a special function for the use of mains voltage push-buttons or switches. You can activate “corrosion protection” for each input to prevent corrosion and possible functional limitations of the buttons/switches. This ensures that a higher current flows briefly through the push-button/switch when it is actuated. The current pulse prevents corrosion. The function is deactivated in the default settings and can be activated separately for each channel.
Tapos na ang deviceview
- A) Button ng system (LED ng device)
- B) Channel button
- C) Piliin ang pindutan
- D) LC display
- E) Bus port 1
- F) Bus port 2
- G) Input terminals
- H) Ground terminals (GND)

Ipakita sa ibabawview
- 1 Input not activated
 Na-activate ang input
- Ang RX Data ay natatanggap ng bus
- Ang TX Data ay ipinadala sa bus
- °C Temperature indication (in device)
- R Voltage indikasyon (input o output voltage sa mga terminal ng bus)

Start-up
Para ma-commission ang device, kailangan mo munang mag-commission ng Homematic IP Wired Access Point (HmIPW-DRAP).
Mga tagubilin sa pag-install
- Basahin nang buo ang seksyong ito bago simulan ang pag-install.
- Itala ang numero ng device (SGTIN) at ang lokasyon ng pag-install ng device bago ang pag-install para mas madaling matukoy ang device sa ibang pagkakataon. Ang numero ng device ay makikita rin sa nakalakip na QR code sticker.
- Please observe the hazard warnings during installation see Hazard information, .
- The inputs are not disconnected from the mains voltage and provide the bus voltage. Connected push-buttons, switches or other switching elements must be specified for a rated voltage ng hindi bababa sa 26 V.
- Pakitandaan ang haba ng insulation stripping ng konduktor na nakakonekta, gaya ng ipinahiwatig sa device.
- Para sa mga kadahilanang pangkaligtasan sa kuryente, tanging ang ibinigay na Homematic IP Wired Bus cable o isang eQ-3 Homematic IP Wired Bus cable na ibang haba (available bilang accessory) ang maaaring gamitin para sa pagkonekta sa Homematic IP Wired Bus. d.
- You can connect push-buttons/switches or normally closed/normally open contacts to the device.
- Rigid cables can be plugged directly into the clamp terminal (push-in technology). Press the white operating button on top of the terminal to connect flexible conductors or to disconnect all types of conductors.
- Kung ang mga pagbabago sa o trabaho sa pag-install ng bahay ay kinakailangan (hal. extension, bypass ng switch o socket inserts) o sa/sa low-voltage distribution system for mounting or installing the device, the following safety instructions must be ob-served:
Ang pag-install ay maaari lamang isagawa ng mga taong may kaugnay na kaalaman at karanasan sa electrical engineering!*
Maaaring mapanganib ang maling pag-install
- sarili mong buhay,
- at ang buhay ng iba pang gumagamit ng electrical system.
Ang maling pag-install ay nangangahulugan din na ikaw ay may panganib ng malubhang pinsala sa ari-arian, hal dahil sa sunog. Nanganganib ka sa personal na pananagutan para sa personal na pinsala at pinsala sa ari-arian.
Kumonsulta sa isang electrician!
- Kinakailangan ang kaalaman ng espesyalista para sa pag-install:
Ang sumusunod na kaalaman ng espesyalista ay partikular na mahalaga sa panahon ng pag-install: - Ang "5 panuntunan sa kaligtasan" na gagamitin:
- Idiskonekta sa mains
- Secure laban sa pag-restart
- Suriin kung wala ang voltage
- Earth at short circuit
- Cover or cordon off neighboring live parts
- Pagpili ng mga angkop na kasangkapan, kagamitan sa pagsukat at, kung kinakailangan, personal na kagamitan sa proteksiyon;
- Pagsusuri ng mga resulta ng pagsukat;
- Pagpili ng materyal sa pag-install ng elektrikal para sa pag-iingat sa mga kondisyon ng shut-off;
- Mga uri ng proteksyon ng IP;
- Pag-install ng materyal sa pag-install ng elektrikal;
- Uri ng supply network (TN system, IT system, TT system) at ang mga resultang kondisyon ng koneksyon (classic zero balancing, protective earthing, kinakailangang karagdagang mga hakbang, atbp.).
Ang mga pinahihintulutang cable cross section para sa pagkonekta sa device ay: matibay at nababaluktot na cable, 0.25 – 1.5 mm²
Pagpili ng supply voltage
- Ang voltage supply to the device is made only via the Homematic IP Wired Bus. The bus is fed by the Homematic IP Wired Access Point (HmIPW-DRAP) Operating manual HmIPW-DRAP.
- The maximum total current consumption is calculated from the actual number of inputs used. Approx. 4 mA flows through each actuated input; if all inputs are used in sensor mode with NC contacts; this results in:

- An average current consumption can be expected in normal applications with mixed operation of push-buttons, switches and signalling contacts (16 push-buttons, 8 NC contacts and 8 switches). The push-buttons only influence the current consumption if they are operated and are therefore negligible. Since only closed switches must be taken into account, it is possible to use an average value here (half is the switches are closed). The NC contacts are permanently closed and must there be taken into account entirely. This results in an exemplary total current consumption of:

Pagpupulong at pag-install
Magpatuloy bilang mga sumusunod upang i-install ang device sa isang DIN rail:
- Idiskonekta ang power distribution panel at takpan ang anumang live na bahagi, kung kinakailangan.
- Idiskonekta ang kaukulang linya ng papasok na Homematic IP Wired bus.
- Alisin ang takip mula sa panel ng pamamahagi ng kuryente.
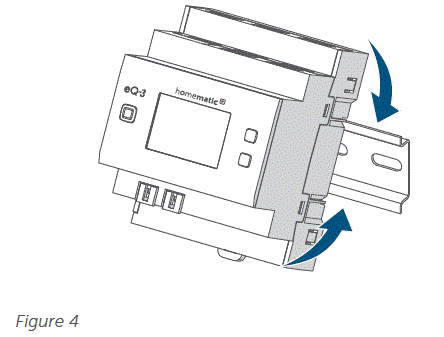
- Ilagay ang device sa DIN rail.
- Dapat mong basahin ang mga titik sa device at sa display.
- Sa panahon ng pag-install, siguraduhin na ang locating spring ay gumagana nang maayos at ang aparato ay ligtas na nakalagay sa riles.

- Wire the device according to the connection drawing and observe the installation instructions see Installation instructions, page 6.

- Connect the bus connection cable to bus port 1 or bus port 2 and connect all other wired devices via the bus.

- Gamitin ang ibinigay na bus blind plug, kung ang bus connection 1 o bus connection 2 ay hindi kailangan.
- Pagkasyahin muli ang takip ng panel ng pamamahagi ng kuryente.
- I-on ang fuse ng power circuit.
- Switch the Homematic IP wired bus on to activate the pairing mode of the device.
Pagpares sa isang control unit
- Basahin ang buong seksyong ito bago simulan ang pamamaraan ng pagpapares.
- Set up your Wired Access Point via the Homematic IP Homematic IP app so that you can use Wired devices in the system. Homematic IP Further information on this is to be found in the operating manual for the Wired Access Point..
- Ang bus ay pinapagana ng Homematic IP Wired Access Point (HmIPW-DRAP). Para sa karagdagang impormasyon, mangyaring sumangguni sa operating manual ng Wired Access Point.
Magpatuloy bilang sumusunod upang ipares ang device sa iyong control center:
- Buksan ang Homematic IP app.
- I-tap ang … Higit pa sa homescreen.
- I-tap ang Ipares ang device.
- Ikonekta ang power supply.
- Aktibo ang mode ng pagpapares sa loob ng 3 minuto.
Maaari mong manual na simulan ang pairing mode para sa isa pang 3 minuto sa pamamagitan ng pagpindot sa button ng system sa ilang sandali.
Ang uri ng button ng system ay depende sa iyong device. Ang karagdagang impormasyon ay makikita sa device overview.
- Awtomatikong lalabas ang iyong device sa Homematic IP app.
- Ilagay ang huling apat na digit ng numero ng device (SGTIN) sa iyong app o i-scan ang QR code. Ang numero ng device ay makikita sa sticker na ibinigay o naka-attach sa device.
- Maghintay hanggang makumpleto ang pagpapares.
- Kung matagumpay ang pagpapares, ang LED ng device ay nag-iilaw nang berde.
- Handa na ngayong gamitin ang device.
Kung ang LED ng device ay umilaw sa pula, pakisubukang muli Mga Flash code at display, pahina 11. - Finally, follow the instructions in the Homematic IP app.
Kung gusto mong pagsamahin ang iyong mga Wired device sa Homematic IP wireless na mga bahagi, maaari mong ipares ang Homematic IP Wired device sa isang (umiiral na) Homematic IP Central Control Unit. Upang gawin ito, ikonekta ang Homematic IP Wired Access Point sa (umiiral na) Homematic IP Central Control Unit gaya ng inilarawan sa operating manual. Pagkatapos ay magpatuloy tulad ng inilarawan sa itaas upang ikonekta ang device.
Operasyon
Pagkatapos ng pag-set-up, direktang available sa device ang mga simpleng operasyon.

- Switch on the display: Press the system button briefly to activate the LC display for all devices connected to the bus.
- Pumili ng channel: Press the Channel button briefly to select the desired channel. On each button press, you can switch to the next channel. The selected channel is indicated by the flashing symbol.
- Mga halaga ng display: If you have not selected a channel, press the Select button briefly to switch between the values.
- Bus supply voltage (V)
- Temperature in the device (°C)
- Walang laman na display
Kung naipares mo ang device sa Homematic IP App, available ang mga karagdagang configuration sa mga setting ng device:
- Assign channels: Assign the individual channel to the desired rooms or solutions.
Pagpapanumbalik ng mga factory setting
Maaaring maibalik ang mga factory setting ng device. Kung ang aparato ay ipinares sa isang Central Control Unit, ang mga pagsasaayos ay awtomatikong maibabalik. Kung ang aparato ay hindi ipinares sa isang Central Control Unit, ang lahat ng mga setting ay mawawala.
Magpatuloy bilang sumusunod upang ibalik ang mga factory setting ng device:
- Pindutin nang matagal ang button ng system sa loob ng 4 na segundo Fig. 7
- Ang LED ng device ay nagsimulang mag-flash ng orange nang mabilis.
- Pakawalan ang pindutan ng system.
- Press and hold the system button for 4 s.
- Ang LED ng device ay umiilaw na berde.
- Bitawan ang button ng system upang tapusin ang pagpapanumbalik ng mga factory setting.
- Magsasagawa ang device ng pag-restart.
- Kung ang LED ng device ay umilaw sa pula, pakisubukang muli Mga Flash code at display, pahina 11.
Pagpapanatili at paglilinis
- Ang device ay walang maintenance para sa iyo. Iwanan ang anumang maintenance o repair sa isang espesyalista.
- Palaging patayin ang mains voltage (i-off ang circuit breaker) bago gawin ang terminal compartment ng device at kapag ini-install o inaalis ang device! Mga kwalipikadong electrician lamang (alinsunod sa VDE 0100) ang pinahihintulutang magsagawa ng trabaho sa 230 V mains.
- Linisin ang device gamit ang malambot, malinis, tuyo at walang lint na tela. Ang tela ay maaaring bahagyang damppinahiran ng maligamgam na tubig para maalis ang mas matigas na marka. Huwag gumamit ng anumang mga detergent na naglalaman ng mga solvent para sa mga layunin ng paglilinis. Maaari nilang masira ang plastic housing at label.
Pagtatapon
 This symbol means that the device must not be disposed of as house-hold waste, general waste, or in a yellow bin or a yellow sack. For the protection of health and the environment, you must take the product and all electronic parts included in the scope of delivery to a municipal collection point for waste electrical and electronic equipment to ensure their correct disposal. Distributors of electrical and electronic equipment must also take back waste equipment free of charge. By disposing of it separately, you are making a valuable contribution to the reuse, recycling and other methods of recovery of old devices. Please also remember that you, the end user, are responsible for deleting personal data on any waste electrical and electronic equipment before disposing of it.
 Ang CE mark ay isang libreng trademark na inilaan para lamang sa mga awtoridad at hindi nagpapahiwatig ng anumang katiyakan o garantiya ng mga ari-arian.
- Kung mayroon kang anumang teknikal na tanong tungkol sa appliance, mangyaring makipag-ugnayan sa iyong espesyalistang dealer.
Mga teknikal na pagtutukoy
- Short description HmIPW-DRI32
- Supply voltage 24 VDC, ±5 %, SELV
- Klase ng proteksyon II
- Degree ng proteksyon IP20
- Temperatura sa paligid -5 – +40°C
- Timbang 165 g
- Dimensions (W x H x D) (4 HP) 72 x 90 x 69 mm
- Current consumption 135 mA max./2.5 mA typically
- Power loss of the device for thermal calculation 3.25 W max.
- Standby power consumption 60 mW
Input
- Dami 32
- Signal voltage 24 VDC, SELV
- “0” signal 0 – 14 VDC
- “1” signal 18 – 24 VDC
- Signal current 3.2 mA (corrosion protection: approximately 125 mA)
- Signal duration 80 ms min.
- Line length 200 m
- Uri ng cable at cross section na matibay at flexible na cable, 0.25 – 1.5 mm²
- Installation On mounting rail (DIN-rail) according to EN 60715
Napapailalim sa mga pagbabago.
Pag-troubleshoot
Hindi nakumpirma ang utos
Kung hindi kinukumpirma ng kahit isang receiver ang isang utos, ang LED ng device ay umiilaw ng pula sa dulo ng nabigong proseso ng paghahatid.
Flash codes and displays
| Flash code/display | Ibig sabihin | Solusyon |
| 1x orange at 1x berdeng ilaw (pagkatapos i-on ang Wired Bus) | Pagpapakita ng pagsubok | Maaari kang magpatuloy sa sandaling huminto ang test display. |
| Mga short orange flashes (bawat 10 s) | Aktibo ang mode ng pagpapares | Ilagay ang huling apat na digit ng numero ng device (SGTIN) sa iyong app o i-scan ang QR code. |
| Maikling orange flashes | Paghahatid ng data ng pagsasaayos | Maghintay hanggang makumpleto ang paghahatid. |
| Maikling kulay kahel na kumikislap (sinusundan ng tuluy-tuloy na berdeng ilaw) | Nakumpirma ang paghahatid | Maaari mong ipagpatuloy ang operasyon. |
| Maikling kulay kahel na kumikislap (sinusundan ng tuluy-tuloy na pulang ilaw) | Nabigo ang paghahatid | Pakisubukang muli tingnan mo Comhindi kumpirmado, pahina 10. |
| 6x na mahaba ang red flashes | May sira ang device | Pakitingnan ang display sa iyong app para sa mga mensahe ng error o makipag-ugnayan sa iyong retailer. |
| Alternating mahaba at maikling orange flashing | Pag-update ng software | Maghintay hanggang makumpleto ang pag-update. |
| E10 | Masyadong mataas ang temperatura | Bawasan ang nakakonektang load at hayaang lumamig ang device. |
| E11 | Under-voltage (bus voltage masyadong mababa) | Suriin ang voltage supply at ayusin ang voltage supply alinsunod sa bilang ng mga device na konektado. |
Free download of the Homematic>IP app!

Awtorisadong kinatawan ng tagagawa
- eQ-3 AG
- Maiburger Straße 29
- 26789 Leer / GERMANY
- www.eQ-3.de
FAQ
Maaari bang gamitin ang device sa labas?
No, the device is designed for indoor use only to ensure optimal performance and longevity.
Paano ko linisin ang device?
Use a soft, clean lint-free cloth for cleaning. Avoid detergents containing solvents as they may damage the device.
What should I do if I encounter a command not confirmed issue?
Refer to section 8.1 of the manual for troubleshooting steps related to command not confirmed errors.
Mga Dokumento / Mga Mapagkukunan
 |
homematic IP DRI32 32 Channels Wired Input Module [pdf] Gabay sa Pag-install DRI32, DRI32 32 Channels Wired Input Module, DRI32, 32 Channels Wired Input Module, Wired Input Module, Input Module, Module |